Sending emails with Azure Data Factory
Sending notification emails is a key element of many workflows and pipelines, but unfortunately, ADF does not support it out of the box. This tutorial will show how to leverage Azure Function Apps to augment the capabilities of ADF. By the end of it you will know how to set up an Azure Function and all the associated resources for sending emails for all your pipeline needs. I have attempted to make the function general enough so that it can be shared across projects. Most of the complexity will come from supporting multiple outgoing email accounts.
If you like to live on the edge, you can keep your passwords in plain text. Then you are just a git clone away from sending emails. However, please don't do it🙏; the code will require some minimal changes too.
Now, there are many tutorials on the internet about how to achieve the same results using Power Automate or Logic Apps. As with any design decision there are trade-offs which you should consider when choosing one method over the other. By using Function Apps, you get access to a much simpler licensing model and reduced costs. Another advantage is that you have access to the full source code which makes it possible to tailor behaviour to your heart's content making it perfectly fit your needs. The disadvantages are that you don't have access to a no-code interface anymore and if you need other things only available in Power Automate you'll end up needing it again or having to code them. However, I'll try to keep a steady rate of ported functionality coming in.
All resources will be configured via the Azure Portal (the CLI works as fine and it is better documented by Microsoft) just to do it the hard way.
Let's get started!
The Ingredients
The following resources will be needed to make everything work.
 An App defined in Active Directory. We'll need in order to set the permissions necessary to enable access to key vaults;
 Key Vault, to keep the password for our email accounts safe;
 A Function App that will be responsible for sending the emails;
.svg) A storage account where a very simple JSON based DB will be kept with the details for the accounts we want to send emails from.
A storage account where a very simple JSON based DB will be kept with the details for the accounts we want to send emails from.
Registering the App
The first thing we'll do is registering a new App in Active Directory. This way we can set up the permissions to access the Key Vault and limit those to only our Function App.
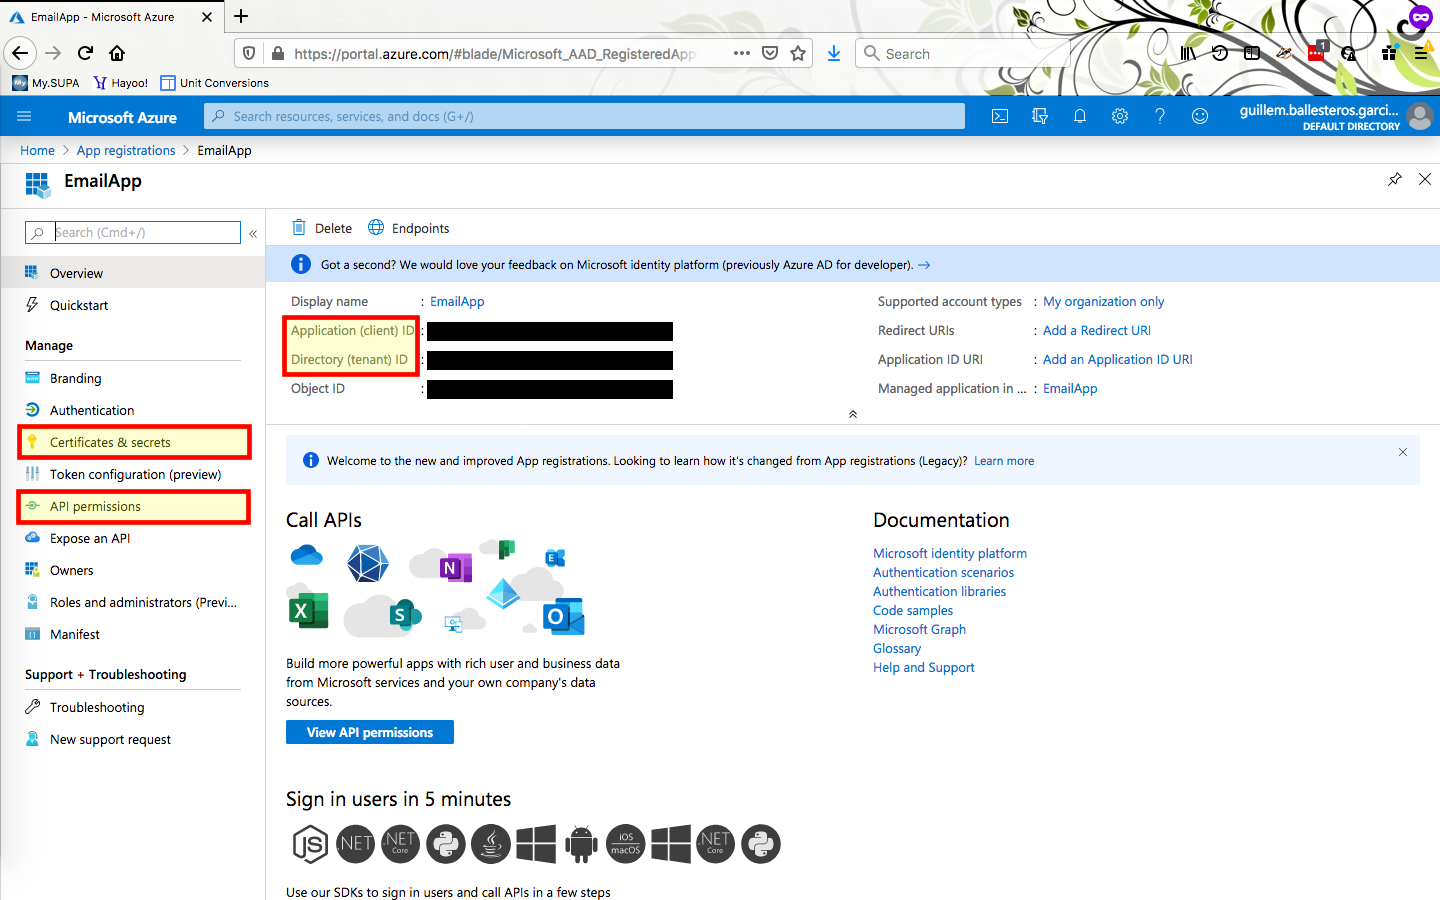
Either go to the Active Directory blade and click on App Registrations or search for it directly. Once there just create a new registration. Once it's created, remember that on the overview summary you can find both the client ID and tenant ID, you'll need both of them.
We can now grant the App permissions to access key vaults. On the left blade you'll find the App Permissions menu. Follow through and then add a permission to access key vaults. Before leaving remember to Grant Admin consent for Default Category.
The last thing we need from our freshly created app is a secret that grants its holder the ability to make use of the App's permissions. To generate it go to the certificates and secrets menu and generate a new client secret. You'll only get one chance to copy the generated secret so be sure to keep it somewhere safe.
By now you should have access to the a client ID, your tenant ID and the app secret. All of them will be needed to access the key vault. You should also have added permissions to access key vaults.
Key Vault
Now lets get a place where we can keep our email account passwords safe. Create a new key vault and once the new resource is ready, add a new access policy for the registered app. Now making use of the client ID, tenant ID and app secret we should be able to access the secrets.
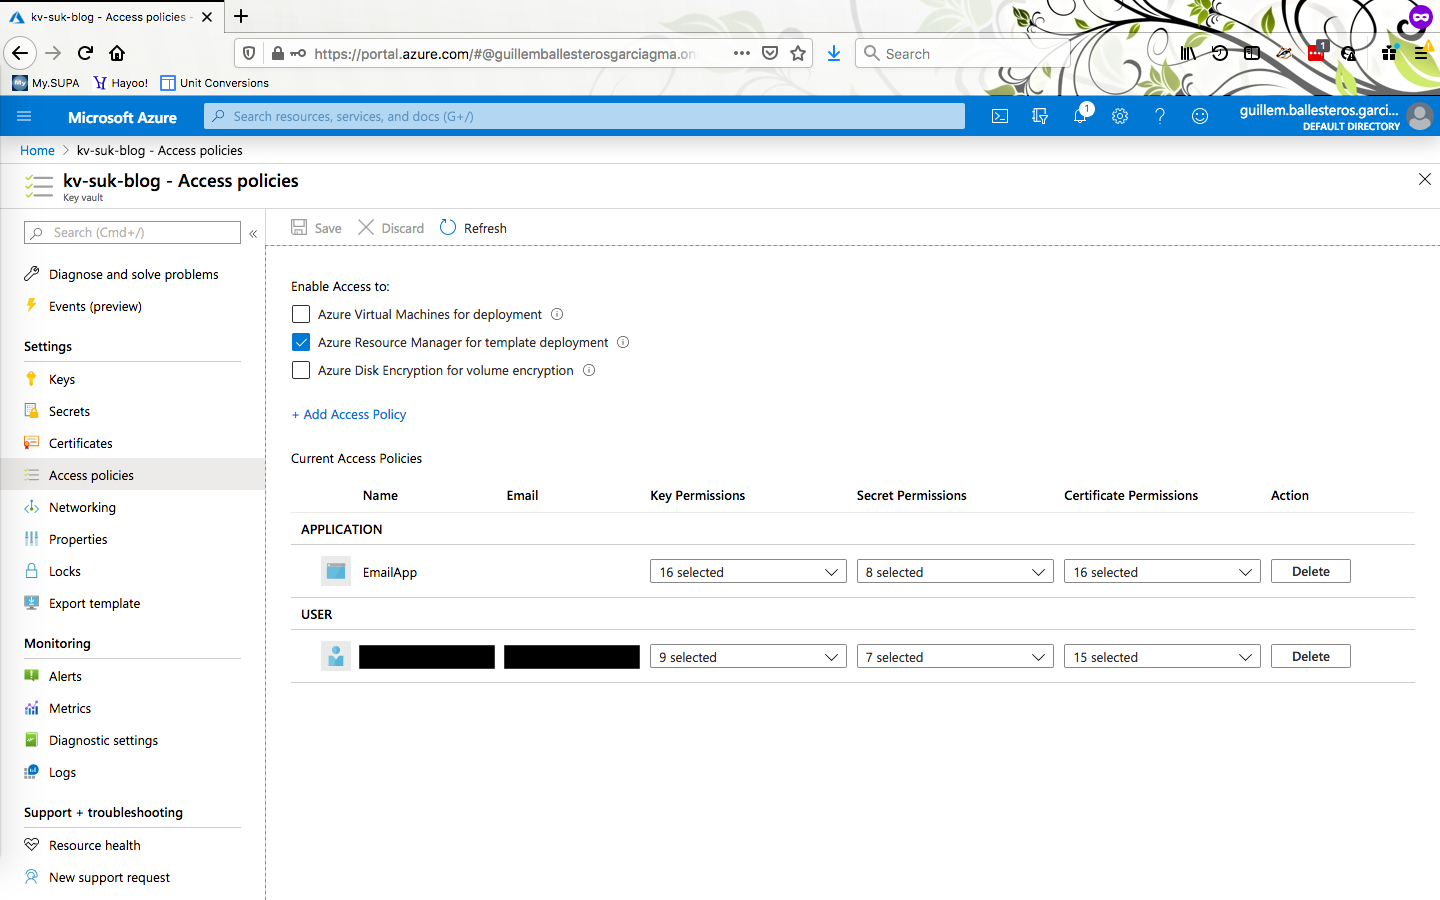
Before leaving this page note that the in the overview you can find the DNS name for the key vault. You will also need it later on when configuring the app.
Password Database
The details for each of the email accounts we need to send email from will be kept in a JSON file stored in the storage account associated with the Function App. One could of course spin up a real DB or use Table storage but for our simple needs this is more than enough.
The one thing we need to be careful about is not storing passwords in plain text. Instead we only keep here the name of the key vault secret that actually contains the secret. Besides the key vault secret name, our DB also includes for each user its email address, host for the SMTP server and connection port.
Here is an example of our "DB".
[
  {
    "user": "xxx",
    "email": "vindiesel@gmail.com",
    "host": "smtp.gmail.com",
    "port": 587,
    "keyvault_secret": "xxx-kv-secret"
  },
  {
    "user": "yyy",
    "email": "whyarewehere@gmail.com",
    "host": "smtp.gmail.com",
    "port": 587,
    "keyvault_secret": "yyy-kv-secret"
  },
  {
    "user": "zzz",
    "email": "snorlax@outlook.com",
    "host": "smtp-mail.outlook.com",
    "port": 587,
    "keyvault_secret": "zzz-kv-secret"
  }
]
This file will have to be stored in a file share in the storage account that is
associated with the Function App. This is configured while creating the app
later on. As it currently stands, the file must be called emails.json and
placed in the root of a file share called email-app.
Before jumping to the next section we need to go back to the key vault that was created above and for each of secrets defined in the DB store the email account passwords.
Setting up a dev environment (optional)
If you want to run the Function App locally or work on developing it further you'll need to set up a development environment. Otherwise you may just skip all of this section.
For this post I've decided to set up my development environment all within a docker container. You can download the dockerfile and build the container by doing:
docker build azuretoolkit:latest .
on the same directory you have downloaded the dockerfile. The container is set up with the Azure CLI, the Azure Core Tools and pyenv. With this you can follow step for step Microsoft's docs for Function Apps.
You can get into the container by doing,
docker run -it -p 7071:7071 --mount src=`pwd`,target=/tutorial,type=bind azuretoolkit
Port 7071 is being exposed, this is the default port used by Function App during local development. Your current directory is also being mounted so that you have persistent storage for the development of the app. Once inside we have to setup the Python environment. That includes creating a Python 3.6 virtual env and installing the Azure libraries for Python. The following code will do the trick.
pyenv 3.6.9 -v
pyenv virtualenv 3.6.9 Blog
pyenv activate Blog
pip install azure-storage-file-share azure-keyvault-secrets azure-identity
Function App
Time to create a Function App. It is here where our functions will be managed from and where we can define the environment variables that will be seen by them. Azure Function Apps consist of a collection of functions each with it's own triggers and endpoint.
Go on and create the Function App. Just be sure to select Python 3.7 as the runtime stack. If you are running within the docker dev environment created in the previous section change directories to the /tutorial directory and then get and publish it to the Function App you just created.
git clone https://github.com/GCBallesteros/EmailApp
func azure functionapp publish <appname_given_to_azure_function>
The code you've deployed exposes only one endpoint associated with the
httpemail function.
Before finishing configuring everything let's take a quick tour of the code.
All code resides in
There are 4 main parts to that.
parse_request- Extracting the relevant parameters from the incoming requesting or setting them to default values.SenderDB- The incoming request must have a user defined which we will retrieve from our text based DB. In the example above the share name and the name we've given to the json DB are hard coded but this could also be parametrized easily if we so wanted.EmailDeliverer- Setting up he class responsible for actually delivering the email.- Delivering the email that was passed in in the request.
Full details on the meaning of each parameter can be gathered from each of the
elements' above docstrings. The code itself is mostly glue to interact with the
Azure Python SDK and using the standard
We had left for the very end finishing the configuration. Environment variables can be defined in the Configuration section of the Function App. These can later on be accessed in Python by doing for example:
os.environ["AzureWebJobsStorage"]
This one in particular is defined for every Function App and it holds the connection string to the storage associated with it. Anyways, you will need to define the following 4 variables.
AZURE_CLIENT_IDAZURE_CLIENT_SECRETAZURE_TENANT_IDKEY_VAULT_URI
Their name is important as those are the ones expected by the Azure SDK to connect to a key vault. In the code provided this happens within the get_sender function and looks like:
credential = DefaultAzureCredential()  # expects environ variables to be defined
client = SecretClient(
    vault_url=os.environ["KEY_VAULT_URI"], credential=credential
)
🥊 Ready to rumble! 🥊
If every thing is set correctly you should be able to send a post request to the your new and shiny Function app and see an email pop up in your email.
You can either directly encode your request on your browsers URL. For example:
https://blogemailapp.azurewebsites.net/api/httpemail?code=<very long code>&user=xxx&subject=Vinny&recipients=myemail@gmail.com,john@gmail.com&body=Hi this is Vinny
As you can imagine this is not very convenient. So we can also use Python's requests library like so,
import requests

# not using HTTPS! To enable it visit:
# https://2.python-requests.org/en/v2.8.1/user/advanced/#ssl-cert-verification
requests.post(
    "http://blogemailapp.azurewebsites.net/api/httpemail",
    params={
        "code": "very_long_key",
        "user": "xxx",
        "subject": "test",
        "recipients": "myemail@gmail.com,john@gmail.com",
        "body": "Hi this is Vinny",
    }
)
Or we can do it directly from Azure Data Factory which is what we had set to do at the start. Once you've added the Azure Function step you will need to configure it. In th settings you will have to create a new Azure Function linked service that will allow you to access the functions defined in the linked Function App.

The other 3 parameters you have to set are:
- Function name: HttpEmail
- Method: Post
- Body
The Body contains the parameters being sent to the function and it's the same
as for the Python example except for the trailing comma after the last
parameter.
{
    "code": "very_long_key",
    "user": "xxx",
    "subject": "test",
    "recipients": "myemail@gmail.com,john@gmail.com",
    "body": "Hi this is Vinny"
}
Remember that here you can make full use of dynamic content to build better emails, choose delivery email account based on some result or any other crazy idea you may come up with.
Outro
There is still a lot of room for improvement so please fork, clone and send in
your pull requests. In the next
post I will look into how to make use of Jinja2 in a function to make email
templates and avoid having to write out manually the content of the email in
the request body.
Just after finishing this entry I added an additional optional parameter to the
app to configure the MIME type of the email message. This parameter,
mimetype, defaults to plain but it can also be set to html if the
body of your email is valid HTML as we will see in the next blog post.